A new list of recipients is created by clicking the button Add new list. A form will appear in which you will fill in the name of the new recipient list (name of the mailing list is public and may show up in automatically generated UTM tags for Analytics) and optionally its more detailed description (which is only visible in the platform). After clicking on the Save button the list will be created and individual recipients can be stored in it.

Keep in mind that campaigns can be sent to multiple mailing lists as well as subset of a list matching a delivery capping condition.
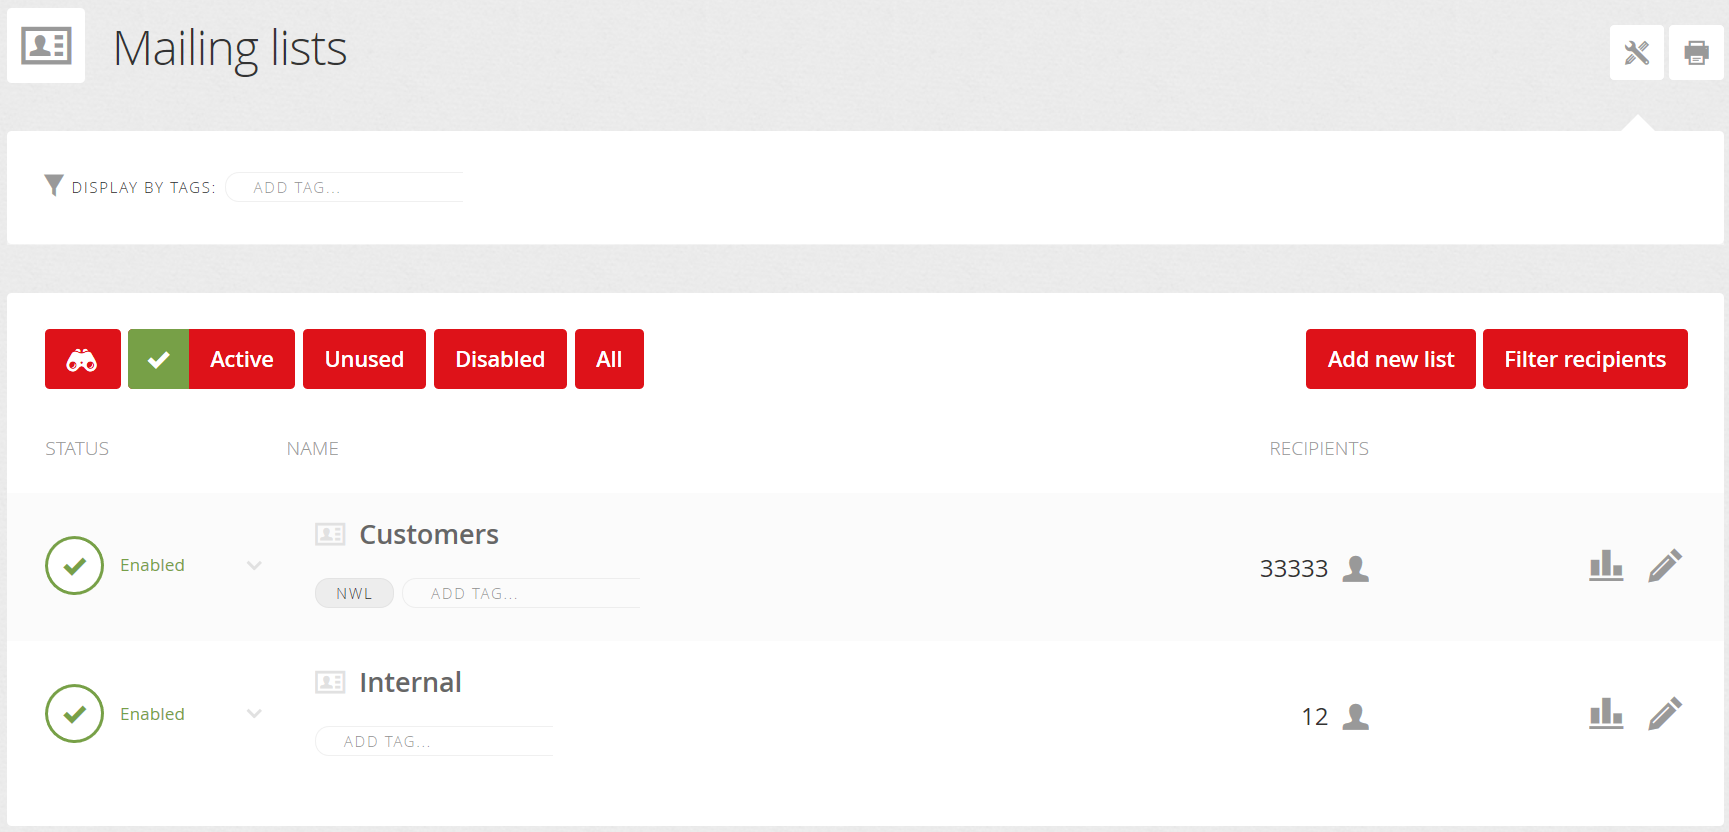
The recipient lists are divided under the following tabs:
- Active – mailing lists that were updated or used in campaign in the last calendar month.
- Unused – mailing lists that were not updated or used in campaign in the last calendar month.
- Disabled – mailing lists that were manually disabled (using Disable button, which is located in the row for each list). No campaign will be sent to disabled mailing list.
- All – all mailing lists available in the system.


You need to enter the recipient's full email address/mobile phone number in the search field. You can use “*” to search by partial match – for example, on the basis of the entry *@gmail.com all recipients with a mailbox on gmail.com will be searched, on the basis of the entry +420777* all recipients whose telephone number starts with +420777 will be searched.
Moving the mouse pointer to a line belonging to a particular campaign will display additional options for working with the list:
- Enable/Disable – clicking the Enable/Disable button enables or disables the respective mailing list. You can not send any campaign to a disabled mailing list.
- Delete – removes the mailing list from the system. Deletion will be permanent and along with mailing list, some statistical & historical data of recipients will be removed depending on whether the recipients exist in other lists or not.

Click the
By clicking on the
The recipients list is opened by clicking on its name or on the number of recipients contained in it.
Managing recipients
Add recipient
A quality and maintained database of recipients is the key to success. There are multiple ways how to add recipients to mailing lists. It could be done automatically (recipient import), manually (inserting recipients one by one), but the most recommended method to automate mailing list recipient data updates is using data sources.
Recipient detail
You can save information (recipient data) for each recipient in the list, which you can then use in campaigns for personalization or segmentation. The data is divided into several groups on the recipient's card. The only required field is email.
CONTACT INFO
| Field | Description | Merge tag |
|---|---|---|
| recipient's email address (mandatory field) | [EMAIL] | |
| Reply-to | allows to set an email address for replies - you can find more about setting up and using an address for replies HERE | [REPLY_TO] |
| Phone | recipient's phone number | [PHONE] |
| Mobile | recipient's mobile phone number (in international format, without spaces, e.g.: +44XXXYYYZZZ) - mandatory field if you want to send an SMS campaign to recipients | [MOBILE] |
| Fax | recipient's fax phone number | [FAX] |
| Status | cannot be manually set or edited, it is a system field |
PERSONAL INFO
| Field | Description | Merge tag |
|---|---|---|
| Salutation | optional salutation to the recipient | [VOCATIVE] |
| Title | recipient's title | [PREFIX] |
| First name | recipient's first name | [FIRST_NAME] |
| Last name | recipient's last name | [LAST_NAME] |
| Nickname | recipient's nickname | [NICK_NAME] |
| Gender | recipient's gender – values can be entered in the imported file or data source in different forms:
|
[GENDER] |
ADDRESS INFO
| Field | Description | Merge tag |
|---|---|---|
| Company | name of the company | [COMPANY] |
| Address | street | [STREET] |
| ZIP | postal code | [ZIP] |
| City | city | [CITY] |
| Country | country | [COUNTRY] |
| State | state | [STATE] |
CUSTOM INFO
In 25 custom fields ([CUSTOM1], [CUSTOM2],...., [CUSTOM25]) you can save important information about recipients, for example from your CRM system, which you can then use again for personalization or segmentation. It can be, for example, various dates (birthday, date of first/last purchase,...), number of points in the loyalty program, level of the loyalty program, customer category, favorite categories/brands, and much more.
If the custom fields will contain a date that you then want to work with in the campaign (delivery capping), it must be inserted in one of the supported formats for custom fields (date_us, date_us_short, date_us_md, date_eu, date_eu_short, date_eu_dm).
Custom field names can be renamed. Just click the pencil icon on any recipient's detail tab to edit the field name. Renaming a field name will be reflected across the entire list of recipients.
The name of the custom field will also be named after the name of the given parameter in the case of importing recipients from data sources, or according to the column name in the case of importing from CSV/XLS.

Keep in mind that renaming custom field names can only make it easier for you to navigate the recipients detail tab and delivery capping filters. In the case of using custom fields in message content, conditions in the template, etc. it is necessary to still work with these fields as merge tags/variables in the [CUSTOM1] / [% recipient.CUSTOM1 -%] format .
COLLECTED DATA
These are values/data that have been obtained (if they have been clearly identified) based on measurements from tracked links in messages sent from Mailkit.

| Field | Description | Merge tag |
|---|---|---|
| Continent | continent (e.g. Europe) | [GEO_CONTINENT] |
| Country | country (e.g. Germany) | [GEO_COUNTRY] |
| State/Region | state or region (e.g. Baden-Wurttemberg) | [GEO_REGION] |
| City | city | [GEO_CITY] |
| Operating system | the operating system of the device on which the link was clicked | [GEO_OS] |
| Browser | the browser in which the link was displayed | [GEO_BROWSER] |
First, you need to open the list of recipients to which the new recipient is to be entered - either by clicking on its name or on the![]()
This form contains all the information that may be available to the recipient on the system. These include personal information (such as name and gender), contact information (such as email and phone), address and up to 25 custom fields, which allow you to store all relevant information about the recipient to power your personalization and targeting.

Recipient status
Mailkit distinguishes 5 status types of a recipient.
- Unknown (


- Active (


- Unsubscribed (

- Temporarily undeliverable (


- Permanently undeliverable (

Recipient history
Cliking the

Created: date of recipient record creation.
Last update: last time the recipient record has been updated (record can be updated using a data source, import, manual editing or by recipient's action in an email).
Consent date: date a consent has been recorded (if any).
Consent source:
- N/A – consent not available
- Subscribe – consent recorded via an API function mailkit.mailinglist.adduser
- Subscribe (form) – consent recorded using standard Subscribe form.
- Revalidate (form) – an unsubscribed recipient resubscribed using Subscribe form.
- Link in mail – consent has been registered through a confirmation link in mail by a CONFIRM_URL function.
- API revalidate – an unsubscribed recipient resubscribed using mailkit.mailinglist.adduser.
- API 3rd party – consent has been recorded by a 3rd party and passed on using the mailkit.mailinglist.adduser function.
Last sent: date of last delivery to recipient.
Status: current recipient status.
By default, the history of the recipient (for the last year) is displayed, which is related to the given recipients list (Mail list history). By clicking on the "Complete recipient history" button, it is possible to view the complete history of the recipient (for the last year), i.e. in one window you will then get a complete overview of all messages sent to the recipient over the last year.
Mailkit can also generate subscribe forms that you can place on your website to allow visitors to sign up for your newsletters. In such case your signup process will be completely handled by Mailkit – from collecting the address, sending a confirmation email, tracking cofirmation and consent records to adding confirmed recipients to the lists.
