Every node has a menu with few items (depending on the node), which appears after a single click.

- EDIT - displays node modal, double click on the node functions the same,
- DELETE - displays alert asking user if they are sure to delete the node form journey,
- COPY - creates an exact copy of the node (including all of it’s settings),
- VIEW - displays the sample view of data which are processed in the node, and also displays the number of recipients which are/were:
- Currently being processed
- Successfully processed
- Not processed

- RUN - initiates the journey (this item is exclusive to the NOW trigger)
There are several node categories:

The trigger is not started by turning on the entire journey, but by clicking the “RUN” button. The ON/OFF switch for starting/stopping the journey in the position (see the image below) indicates that the journey was started manually, not by other triggers. For further editing, the journey must then be “turned off” again.


The end time is the same as the start time, i.e. when the start time is monday 4:30 PM and the end day is friday, it will also be 4:30 PM.
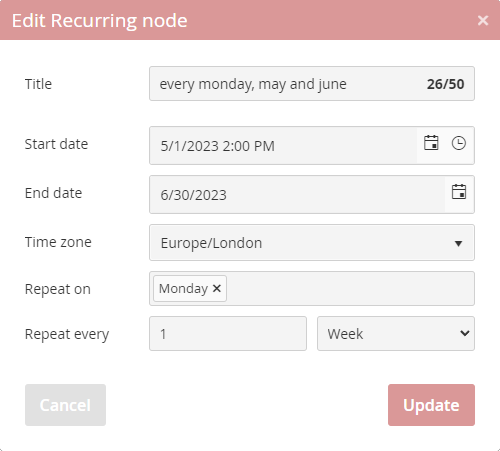

The journey with a scheduled trigger runs once or multiple times, on the date and time it was scheduled.


Nod má několik režimů, které lze vybrat z nabídky pro “Run on Events”:
Subscribe to recipient list → when a recipient subscribes to the selected recipient list, they will enter the journey.
This only happens when the recipient has subscribed through a subscribe form , or has been added via API call mailkit.mailinglist.adduser.

Email read → when a recipient opens an e-mail from a selected campaign or message, they will enter the journey. A recipient can enter the journey only once.
When a single campaign is selected, it is possible to select a message or multiple messages, when multiple campaigns are selected, the message selection is disabled.
Note: If the account doesn’t yet have any sent campaigns, the Campaign menu doesn’t show up.

Email click → when a recipient clicks an e-mail from a selected campaign or message, they will enter the journey, a recipient can enter the journey only once.
When a single campaign is selected, it is possible to select a message or multiple messages. When multiple campaigns are selected, the message selection is disabled.
The value entered in the “Link” field is compared with the links in the campaing delivery/deliveries as a string with the “contains” operator, i.e. if you want to work with a specific link, you need to enter its entire URL - e.g. https://www.mailkit.com/resources/documentation/
If you fill in the “Link” field with the value https://www.mailkit.com, the journey will respond to clicking on any link in the email that led to our website.
If you enter * as the value in the "Link" field, the journey will respond to clicking on any link in the sent email.
Note: If the account doesn’t yet have any sent campaigns, the menu Campaign doesn’t show up.

Operation Execute → in this mode, the trigger receives recipients from an Operations - Execute node in another journey.

Event API → the trigger reacts to an event the same way a remarketing campaign does. It can react to incomplete or completed events, after a set time. The output is the data from the event, which are in the Event and EventItems data structures, and can be used in the template, the same way as in the remarketing campaign..

API → recipient will be inserted into the scenario using the API call mailkit.journeys.trigger.
In the “Event tag” field, you need to insert the value of the “event_tag” parameter from the API call. Entering the tag name in the “Event tag” field must be confirmed with enter. Multiple event tags can be inserted into the field.

SOURCES
Most common use for the Sources is to insert recipients into the journey, but these nodes also allow the recipient data already in the journey to be enriched by data from various sources, at a given point in the journey.
Enriching data
The first source node in each journey is a primary node, and all other source nodes which come after that are enriching the recipients which came from the primary source node.
There is an exception with the ON EVENT trigger node - since this node is also a source of the recipient data (while not being a source node itself), it is considered a primary source node, and every source node after it, is an enriching source.
In case of multiple source nodes, the primary one is designated by a dark border.


DELIVERY FEED
This source node inserts recipients from the selected delivery feed, or enriches the data of the recipients already in the journey.


SQL
Access to the data in a specific SQL datovém zdroji. After selecting an SQL data source, a list of individual columns is displayed, so the column in which the email is stored can be selected.


When the journey and the node has been selected, a connection is made, and all the recipients from the selected journey will move into the Source Collect -> which means the Operations Collect node will be empty.
Further recipients coming into the Operations Collect node will be moved immediately into the Source Collect node.


EVENT
This source allows you to enrich the recipients data with the data from an event - it mimics the functionality of the Event plug-in for the templates.
It has to be preceded by a node which outputs recipients (either other source nodes, or the ON EVENT trigger), because in order to search for an event, the node has to have the e-mail address to search by.


Title – node title
URL – webhook URL
HTTP method – one of the following methods can be selected:
- GET (default method)
- POST
- PUT
- DELETE
- PATCH
Authentication – if the call needs to be secured/authenticated, enter a Username and Password
Parameters (for POST/PUT/PATCH methods) – variables from scenarios can be used/passed, e.g.:
param1=[VAR recipient.city]¶m2=[VAR recipient.customs.custom_1]
Content type – you can select one of the following types:
- application/json
- application/xml
- application/x-www-form-urlencoded
- text/plain
Regular expression – for structured responses in JSON or XML, the conversion is clear and the structure will be available unchanged. For other responses, a regular expression can be defined to capture specific data (not available for application/json and application/xml types).
Instance name – to make it easier to find data in the data structure, you can specify the name of the webhook instance. If the name is not specified, the instance will be identified by the value in the actual_node field in the data of the given WEBHOOK node.

The data obtained from the webhook will be stored in the scenario in the scenario.webhooks structure, which you can then use in your email template.

QUERY BUILDER
This node allows you to use a recipient list and apply segmentation rules saved in step 4 to it when filtering recipients or during delivery capping setup.

Title – node title
Recipients list – select the recipient list to which the rules should be applied
Query – select one of the saved rules that will be applied to the recipient list selected above. All saved rules can be found in the Mailkit UI in the Profile → Queries menu, where you can add additional rules or edit or delete existing ones.

There are three groups of operators:
STRING – for operations with text values
- equal
- not equal
- begins with
- doesn't begin with
- ends with
- not ends with
- contains
- doesn't contain
Example: recipient.city EQUAL Červené Pečky -> records with the value „Červené Pečky“, „Cervené Pecky“, „cervené pečky“, „ČERVENÉ Pečky“ and others will be searched
- is empty
- is not empty
- exact match
- not exact match
Example: recipient.city EXACT MATCH Červené Pečky -> ONLY records with the value „Červené Pečky“ will be searched, not the records „Cervené Pecky“, „cervené pečky“, „ČERVENÉ Pečky“ and others
NUMERIC – for operations with numeric values
- = (equal)
- != (not equal)
- < (less) – ATTENTION, even an empty value is smaller than any number
- <= (less or equal) – ATTENTION, even an empty value is smaller than any number
- > (greater)
- >= (greater or equal)
DATE &TIME – for operations with time data
- equal
- not equal
- before – searches for values with a date smaller (earlier) than the compared value. ATTENTION, even an empty value is smaller than any time data
- not before – searches for values with data that is greater (later) or equal to the compared value
- after – searches for values with a date greater (later) than the compared value
- not after – searches for values with a date that is smaller (earlier) or equal to the compared value. ATTENTION, even an empty value is smaller than any time date.

When working with time data (using time operators), comparisons are made using intervals (INTERVAL) – see the image above. You can use YEAR, QUARTER, MONTH, WEEK, DAY, HOUR, MINUTE, and SECOND as intervals.
To filter on a value in a field (e.g. a custom recipient field), you can work with values:
- [YEAR] – current year
- [MONTH] – current month
- [DAY] – current day
- [HOUR], [MIN], [SEC] – hour, minute, second
- [CURDATE] – current date (in YYYY-MM-DD format, e.g. 2025-10-20)
- [CURTIME] – current time (in HH:MM:SS format, e.g. 14:30:45)
- [NOW] – current date and time (e.g. 2025-10-20 14:30:45)
- [DAYOFMONTH] – position (number) of the day in the month
- [DAYOFWEEK] – position (number) of the day in the week (0=Monday, 6=Sunday)
- [DAYOFYEAR] – position (number) of the day in the year
- [QUARTER] – position (number) of the quarter in the year
- [WEEK] – position (number) of the week in the year
- [MONTHNAME] – name of the month (January, February...)
- [DAYNAME] – name of the day (Monday, Tuesday...)
- [MONTHNAME_SHORT] – month short name (Jan, Feb...)
- [DAYNAME_SHORT] – day short name (Mon, Tue...)
-> based on the condition in the image above, recipients will be selected who have the date the day before yesterday in their custom field (a date 2 days less than the current date (CURDATE)). It is also possible to work with random numbers, e.g.:
"recipient.custom_field.custom_1" BEFORE "date_eu|[CURDATE] - INTERVAL [RAND 30] DAY"
-> based on this condition, the value in custom field 1 (where the date is stored in the date_eu format (DD.MM.YYYY) will be compared with the current date minus a random number of days (1-30)
To work with time data, it is necessary that the data in the field (e.g. custom field) for recipients be in one of the supported formats:
- datetime – e.g. 2024-01-12 12:13:14 or 2024/01/12 12:13:14
- date_us – e.g. 2024-01-12 or 2024/01/12
- date_us_short – e.g. 24-01-12
- date_eu – e.g. 01.12.2024
- date_eu_short – e.g. 01.12.24
- date_eu_dm – např. 01.12.
- date – e.g. 2024-01-12 or 2024/01/12
- date_dm2 – e.g. 31/12
- date_md – e.g. 12/31
- time – e.g. 12:13:14
Variables can be either typed into the input, or it can be chosen from a list of available variables, which can be displayed by the “List Variables” butto 

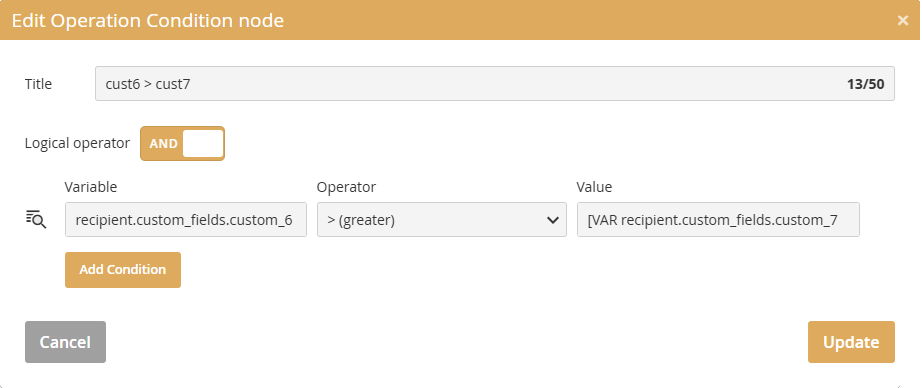
TIP: In the CONDITION node, you can also compare recipient values within their data. For example, if you wanted to select recipients for whom the value in custom field 6 is greater than the value in custom field 7, then the condition would look like this:
recipient.custom_fields.custom_6 is greater [VAR recipient.custom_fields.custom_7]
Working with arrays
While when applying a condition to a recipient list (recipient data), the system automatically goes through all records (recipients) in the recipient list, it is a bit more complicated with SQL data sources or Event structures.
By writing it differently, you can get different results:
Simple array ([*])
- e.g. Events[*].currency –> the system will go through the "currency" field for all events
Nested array ([*]…[*])
- e.g. Events[*].EventItems[*].price –> the system will go through all events and in all items the "price" field
Indexed array ([0])
- e.g. Events[0].currency –> the system will will go through the "currency" field of the first ([0]) event
Events data tree example:
'Events' => #  1 record in Events array]
{

   'first_name' => 'aaa',
   'currency' => 'CZK',
   'gender' => '',
   'status' => 'finish',
   'items_amount' => '200.0000',
   'ID_workflow_event' => 11699290,
   'email' => 'jiri+1@mailkit.eu',
   'items_count' => 2,
   'status_url' => '',
   'decimal_separator' => '',
   'description' => '',
   'language' => 'en',
   'promo' => '',
   'promo_teaser' => '',

   'order_no' => '',
   'invoice_no' => '',
   'modify_date' => '2025-07-23 09:55:04',
   'invoice_url' => '',
   'create_date' => '2025-07-23 09:55:04',
   'promo_value' => '',
   'event_tag' => 'kosik',
   'return_url' => '',
   'thank_you' => '',
   'last_name' => 'kkk'
   'EventItems' => [# 2 records in EventItems array]
   {
      'teaser' => '',
      'item_available' => '',
      'name' => '',
      'date' => '2025-07-23 09:55:04',
      'item_curr' => 'CZK',
      'price' => '100.0000',
      'product_id' => 'A001',
      'product_category' => '',
            'item_total' => '100.0000',
            'product_cat_url' => '',
      'product_url' => '',
      'ID_workflow_event_item' => 62757504,
      'item_qty' => '1.0000',
      'description' => '',
      'item_discount' => '',
            'price_orig' => '0.0000',
      'image_url' => ''
   },
   {
      'product_id' => 'B001',
      'price' => '100.0000',
      'teaser' => '',
      'item_curr' => 'CZK',
      'date' => '2025-07-23 09:55:05',
      'name' => '',
      'item_available' => '',
      'description' => '',
      'item_qty' => '1.0000',
      'image_url' => '',
      'price_orig' => '0.0000',
      'item_discount' => '',
      'item_total' => '100.0000',
      'product_category' => '',
      'ID_workflow_event_item' => 62757505,
      'product_url' => '',
      'product_cat_url' => ''
   }
   ],
}
],
You can then use various condition on events:
- Events[*].EventItems[*].price –> system will go through all ([*]) Events and in them all ([*]) EventItems.price items
- Events[0].EventItems[*].price –> system will go through the first ([0]) Event and in it all ([*]) Eventitems.price items
- Events[0].EventItems[0].price –> system will go through the first ([0]) Event and in it the first ([0]) Eventitems.price item
A node has 2 outputs - TRUE and FALSE. The first output always has the value TRUE. If you then click again in the node output, a branch with the value FALSE will appear.


The basic difference between CONDITION and A/B SPLIT, is that A/B SPLIT can have several outputs, while CONDITION has only two. Recipients in the node are divided to two groups at least, to 11 groups at most (10 groups plus Control Group). Each group is a percentage of the whole, the total has to always be 100 %, otherwise the node can’t be saved. Recipients are divided into groups by random.


If a user needs more limits, they can chain them one after the other. There are two outputs, under the limit (TRUE), and above the limit (FALSE).
For example if the node is set to 100 recipients per 1 hour, the first 100 recipients who reach the node will be sent into the below limit output (TRUE), any recipients after that will be sent to above limit output (FALSE). After 1 hour passes since the first recipient arrived, the limit is cleared for another 100 recipients.


If the recipient already has some value in the attribute, it will be overwritten. There is always at least one attribute, and it can’t be deleted.

In addition to specific static values, attributes can also be set using variables:
Basic time data:
- [YEAR] –> a value corresponding to the current year will be inserted (e.g. 2025)
- [MONTH] –> a value (number) corresponding to the current month will be inserted, i.e. values 01 to 12
- [DAY] –> a value (number) corresponding to the current day of the month will be inserted, i.e. values 01 to 31
- [HOUR] –> a value (number) corresponding to the current hour will be inserted, i.e. values 00 to 23
- [MIN] –> a value (number) corresponding to the current minute will be inserted, i.e. values 00 to 59
- [SEC] –> a value (number) corresponding to the current second will be inserted, i.e. values 00 to 59
Date and time format data:
- [CURDATE] –> a value corresponding to the current date in the format YYYY‑MM‑DD (e.g. 2025‑10‑20)
- [CURTIME] –> the value corresponding to the current time in the format HH:MM:SS will be inserted (e.g. 14:30:45)
- [NOW] –> the value corresponding to the current date and time will be inserted (e.g. 2025‑10‑20 14:30:45)
Extended time data:
- [DAYOFMONTH] –> the value (number) corresponding to the order of the current day of the month will be inserted, i.e. values 1 to 31
- [DAYOFWEEK] –> the value (number) corresponding to the order of the current day of the week will be inserted (0=Monday, 6=Sunday)
- [DAYOFYEAR] –> the value (number) corresponding to the order of the current day of the year will be inserted (1-365/366)
- [QUARTER] –> the value (number) corresponding to the order of the current quarter of the year (1-4)
- [WEEK] –> the value (number) corresponding to the order of the order of the current week in the year (1-53)
Day and month names:
- [DAYNAME] –> the full name (text) of the current day of the week in English will be inserted (Monday, Tuesday...)
- [DAYNAME_SHORT] –> the abbreviated name (text) of the current day of the week in English will be inserted (Mon, Tue...)
- [MONTHNAME] –> the full name (text) of the current month in English will be inserted (January, February...)
- [MONTHNAME_SHORT] –> the abbreviated name (text) of the current month in English will be inserted (Jan, Feb...)
Random value:
- [RAND x] –> a random integer with a value from 1 to x will be inserted
Special operations with texts and numbers:
- [INCR x] –> increases the existing value (number) by the specified value x
- [APP text] –> appends the specified text to the existing value (the added text will be separated by a space)
–> e.g., using the [APP [DAY].[MONTH].[YEAR]] will add the current date to the existing value
- [CLEAR] –> deletes the value (sets an empty text field string)
It is also possible to use the value of one field as the value for another field - for example, if we wanted to set the value from the First Name field in CUSTOM7, we could use [VAR recipient.first_name] as the value.


EXECUTE
A node which sends recipients to the ON EVENT trigger in the Operation - Execute mode, in another journey.
Recipients retain all the data they got in the current journey, so those can be used in the CONDITION node, for example. Execute doesn’t have an output, because recipients which enter it are moved from the journey.


There can be several collections in a journey. Recipients remain in the node for 6 months - they are stored continuously, meaning each recipient will have a set period, and after that period (6 months) it will be removed from the node.
Selecting this node (its name) in a Source - COLLECT node will move all the recipients collected so far, into the Source node. When the connection between the source and operation nodes is made, everytime the journey runs, all the collected recipients will be moved. COLLECT node doesn’t have an output.


Title – node title
Time period – time for which the recipient will "wait" in the WAIT node. After the time has elapsed, the recipient continues to the next (following) node in the scenario.
Leave on Events – the waiting time in the node can be shortened if one of the following actions/events occurs:
- Disabled –> the waiting time will not be shortened and all recipients will leave the node only after the set time has elapsed.
- Subscribe to recipients list → if the recipient has consented, it immediately continues to the next node
- E-mail read → if the recipient opens an email from the selected campaign, it immediately continues to the next node.
- If only one campaign is selected, it is necessary to select a specific campaign delivery/deliveries, or select "Select all messages", then all future campaign deliveries that will be sent from the selected campaign after the scenario is started will be included.
- If multiple campaigns are selected, specific campaign deliveries can no longer be selected and all (even future) campaign deliveries from the selected campaigns will be included.
- E-mail click → if the recipient clicks on a link in an email from a selected campaign, it immediately continues to the next node.
- Link (RegExp) = window for inserting a link or regular expression. The filled-in value is compared with the links in the campaign delivery/deliveries as a string with the "contains" operator, i.e. if you want to work with a specific link, you need to fill in its entire URL - e.g. https://www.mailkit.com/resource/dokumentation/
- If you fill in "https://www.mailkit.com" as the value, the script will respond to clicking on any link in the email that led to our website.
- If you enter * as the value in the field, the script will respond to clicking on any link in the sent email.
- If one campaign is selected, it is possible to select a specific campaign delivery/deliveries, or select "Select all messages", then all future campaign deliveries that will be sent from the selected campaign after the scenario is started will be included.
- If multiple campaigns are selected, the selection of campaign deliveries is not available.
- Link (RegExp) = window for inserting a link or regular expression. The filled-in value is compared with the links in the campaign delivery/deliveries as a string with the "contains" operator, i.e. if you want to work with a specific link, you need to fill in its entire URL - e.g. https://www.mailkit.com/resource/dokumentation/
- Event API → tthis mode reacts to events in the same way as a remarketing campaign. Therefore, if a recipient waiting in the WAIT node has a selected event recorded, it will leave the WAIT node before the set time has elapsed. The system can react to completed or incompleted events with the selected label (tag) after the set time.
- API → waiting can be terminated prematurely by calling the API mailkit.journeys.trigger. Entering the tag name in the "Event label" field must be confirmed with enter. Multiple event labels can be entered in the field.

If none of the events/activities occur within the specified "time", the recipient continues to the next node after it expires.

REACTION
Evaluates reactions in an email message sent from the previous EMAIL node(s) in the given scenario (i.e. one of the EMAIL nodes that precedes the REACTION node).
The REACTION node does not have to be immediately adjacent to the EMAIL node; for example, there may be a WAIT node between them.

Title – node title
Read (YES/NO) – after selecting one specific EMAIL node from the drop-down menu, it will be evaluated whether the recipient has read the email or not.
Click – a click in the sent email selected in the “Read” item will be evaluated
- ANO → you can enter a specific link or a regular expression that will be evaluated. The value is compared with the links in the sent email as a string with the “contains” operator, i.e.:
- if you want to work with a specific link, you need to fill in its entire URL - e.g. https://www.mailkit.com/resources/documentation/,
- if you fill in the value https://www.mailkit.com, the scenario will evaluate clicking on any link in the email that led to our website
- if the field remains empty, the system will respond to all links in the sent email, i.e. if the recipient clicks on any link in the defined sent email, the condition will be met.
- NO → the click in the sent email will not be evaluated, i.e. it is irrelevant whether the recipient clicked in the sent email or not.
The evaluation of the condition for "Click" is active only if the condition "Read" is set to "YES".
The REACTION node, like the CONDITION node, has 2 outputs - TRUE and FALSE. The first output always has the value TRUE. If you then click again in the node output, a branch with the value FALSE will appear.


Sends a selected email campaign. Campaigns sent from the journey have to have the “journey mode” enabled in the advanced campaign settings..
A campaign with journey mode set cannot be sent other than from the journey.

Before the sending itself the recipient has to be saved/updated with the data from the journey, and the recipient list has to be selected. If the recipient should stay in the same list from which it came to the journey, the first item „* Recipient origin“ has to be selected.


SMS
Sends a selected SMS campaign. Campaigns sent from the journey have to have the “journey mode” enabled in the advanced campaign settings.

Before the sending itself the recipient has to be saved/updated with the data from the journey, and the recipient list has to be selected. If the recipient should stay in the same list from which it came to the journey, the first item „* Recipient origin“ has to be selected.


It has several modes, which are selectable from the Action dropdown:
Insert —> recipients which reach this node will be inserted into selected mailing list.

Move —> in this mode the recipient will be moved from one mailing list to another.
If a „* Recipient origin“ is selected, the recipient will be moved from the list in which they were currently in, to the selected list.

Delete —> recipient will be deleted from the selected mailing list.
If a * Recipient origin“ is selected, the recipient will be deleted from the list in which they were currently in.

Unsubscribe —> recipient will be unsubscribed.

