• Features
  • Services
    • Email Authentication
    • Agency Partnerships
    • Email Training
    • Inbox Brand Visibility
    • Deliverability
  • Resources
    • Knowledge Base
    • API documentation
    • Blog
    • Status
    • BIMI inspector
  • About us
    • Contact
    • Terms and Conditions
    • Privacy Policy
    • Privacy recommendations
  • Features
  • Services
    • Email Authentication
    • Agency Partnerships
    • Email Training
    • Inbox Brand Visibility
    • Deliverability
  • Resources
    • Knowledge Base
    • API documentation
    • Blog
    • Status
    • BIMI inspector
  • About us
    • Contact
    • Terms and Conditions
    • Privacy Policy
    • Privacy recommendations
  • Login
    EN CS
Mailkit logo
  • Features
  • Services
    • Email Authentication
    • Agency Partnerships
    • Email Training
    • Inbox Brand Visibility
    • Deliverability
  • Resources
    • Knowledge Base
    • API documentation
    • Blog
    • Status
    • BIMI inspector
  • About us
    • Contact
    • Terms and Conditions
    • Privacy Policy
    • Privacy recommendations
  • Login
    EN CS
EN CS
Login
  • Mailkit
  • Resources
  • Knowledge Base
  • Visual builder
  • Smart Elements
  • Campaigns (16)
    Campaign management Email campaigns Remarketing campaigns Transactional Campaigns Confirmation campaigns SMS Campaigns Content and personalisation Campaign testing and previews Adding links Advanced tracking Content merge tags Campaign AB testing Delivery capping Campaign delivery settings File Manager Manage Polls
  • Journeys (3)
    Journey management Journeys editor Nodes
  • Mailing lists (6)
    Manage recipient list Manual recipient import Subscribe form generator Engagement score Recipient filtering Unsubscribes
  • Reports (6)
    Summary Reports Campaign Reports Campaign delivery report Event Reports Recipients report Deliverability Report
  • Using templates (10)
    Email Templates Conditions & operators Including and processing Working with data Using date & time functions User interface templates Micro-site templates Content Styles Plug-ins Filters and functions
  • Account management (8)
    My account Two-factor authentication (2FA) Data sources Integration Tags and Topics SPF records DMARC record Mailkit Cookies
  • Visual builder (6)
    How Visual builder works Content Blocks Modules Smart Elements Conditional blocks Ready-made templates
  • Campaigns
  • Journeys
  • Mailing lists
  • Reports
  • Using templates
  • Account management
  • Visual builder
Campaign management Email campaigns Remarketing campaigns Transactional Campaigns Confirmation campaigns SMS Campaigns Content and personalisation Campaign testing and previews Adding links Advanced tracking Content merge tags Campaign AB testing Delivery capping Campaign delivery settings File Manager Manage Polls
Journey management Journeys editor Nodes
Manage recipient list Manual recipient import Subscribe form generator Engagement score Recipient filtering Unsubscribes
Summary Reports Campaign Reports Campaign delivery report Event Reports Recipients report Deliverability Report
Email Templates Conditions & operators Including and processing Working with data Using date & time functions User interface templates Micro-site templates Content Styles Plug-ins Filters and functions
My account Two-factor authentication (2FA) Data sources Integration Tags and Topics SPF records DMARC record Mailkit Cookies
How Visual builder works Content Blocks Modules Smart Elements Conditional blocks Ready-made templates
Search

Smart Elements

What are smart elements and how to use them to save time when creating your newsletters.

You often have to perform the same steps when creating a new newsletter. Imagine that you have an eshop and you need to send an email in which you want to show 5 products – i.e. you need 5 pictures, 5 product names, their descriptions, as well as their prices and, last but not least, links (not only) for buttons.

These elements are usually used several times in the newsletter for one product, for example the product name is usually used three times – in the field "Product name" and for the attributes "title" and "alt" in the product image. The same applies to the link we use for the button, for the image, for the title, etc. If you have 5 products in the newsletter, you have to repeat all the steps 5 times. And in other newsletters over and over again.

As well as when preparing a content newsletter with articles from your blog. For each article you need a title, perex, or a picture and of course a link to view the whole article.

To avoid wasting time performing these routine operations, start using smart elements that allow you to automate this process.

Smart element

A smart element is a structure, container or stripe into which basic blocks, such as an image, text, button, etc., are inserted, in which the option of receiving variable data from external sources is activated.

The first step is to prepare the content – a structure with individual blocks (images, texts, buttons…) as they should finally look.

The second step is to enter internal and external variables and set rules for their receiving and use.

Then all you have to do is insert a link to the product/article page on your website and the system will "pull out" the necessary data and apply it to the specified elements. This saves a lot of time by entering only one link for your smart element - the system automatically updates the rest!
 

Creating a smart element for a blog article

We will show you how to create an element in one of the articles on our blog. We will use the text fields for title and perex and the button in the smart element.

So first we create a "skeleton" of the element – for example, a structure with 1 container. We insert the necessary blocks into the container – i.e. 2 text blocks and a button – and modify them into the final design.

In the menu for editing the container, select the “Data” tab and click on the “Begin” button –> the smart element will be activated.

Smart element activation

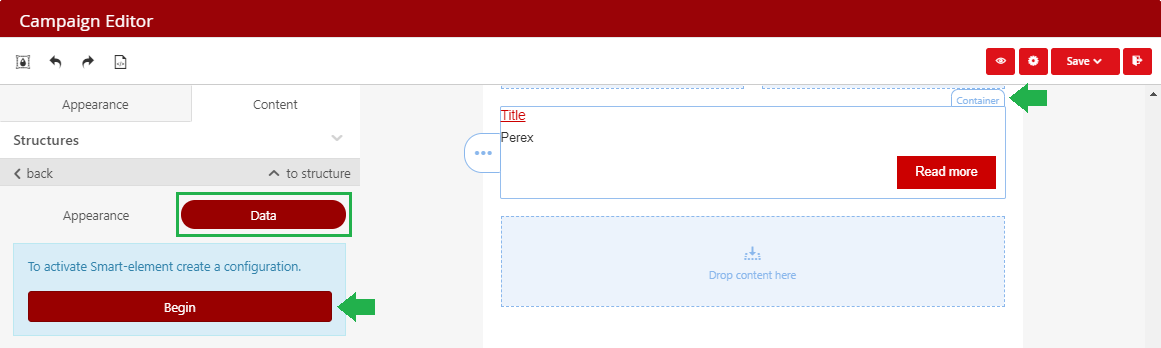
After clicking on the “Begin” button, a menu will expand in which you can:

  • configure all the necessary rules for obtaining values and apply them to the required blocks via variables. Use the "Configuration" tab for this.
  • in the "Appearance" tab, you can manually edit (if necessary) the received values of the configured variables from the web.


Add variableClick thePlus buttonbutton to add variables. For ease of use, clicking on the add icon will display a list of the most popular variables for product blocks or blogs. When you activate a smart element for any object, a URL variable is created by default that cannot be deleted.

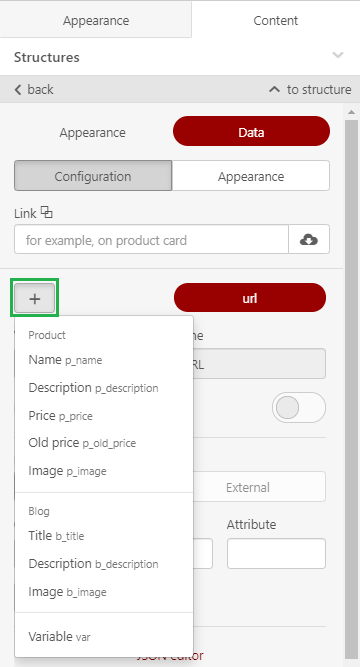
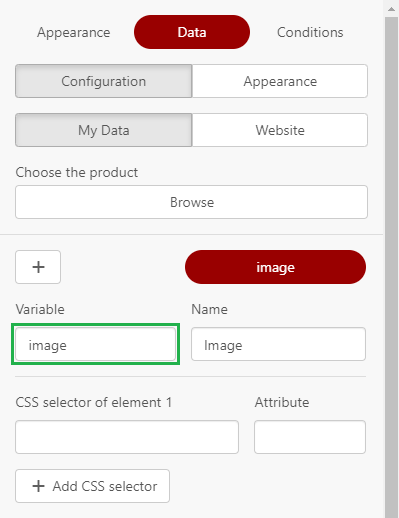
Because we want a block with texts and a button, we will add the variables “Title” and “Description” from the Blog section. Each added variable creates its own item in the Configuration tab. So we have a total of 3 variables – url, b_title and b_description.

Next, we need to configure the rules for obtaining values for these variables and their use in our smart element -> we do this in the section "Matching rules", which consists of 2 tabs:

  • Internal rules – here we set the rules where exactly we need to use the obtained values of variables in the smart element.
  • External rules – here we will configure the rules from where we will get the values of variables from the web.

Rules are configured using a standard mechanism for searching HTML elements through CSS selectors and attributes.


Variable URL configurationVariable URL

This variable has a control for "Dynamic site", which is off by default. If the site from which you want to get values for any of the variables in the smart elements is dynamic, turn on this setting.

A dynamic site is a website whose content is created from the CLIENT side based on the javascript, i.e. receiving HTML pages it is impossible to find necessary elements there without performing all the required scripts before. For example, the price is considered on the fly, etc.

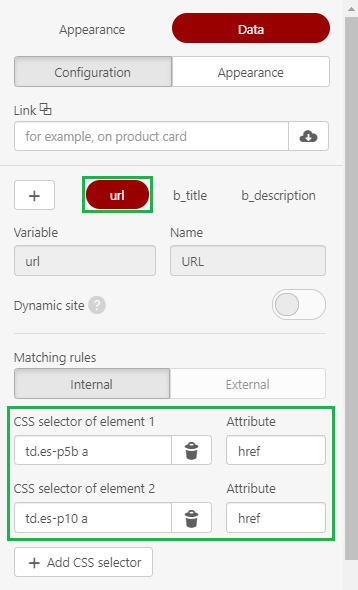
Because we want the link to be stored in the smart element on the title and button, on the "Internal" tab we set the rule that the value of the variable will be set to all elements 'a' (CSS selector field) in the attribute 'href' (Attribute field). Specifically:


Title:

CSS selector: td.es-p5b a

  • td – refers to the <td> tag in which the Title text is inserted
  • es-p5b – is a CSS style used for selection, clearly defining a place in the code. You can use any or all of the styles. In that case it is necessary to separate them with a dot – i.e. the entry would look like this: td.esd-block-text.esd-b-title.es-p5b a
  • a – refers to the element into which the URL value is to be inserted

Attribute: href – means that the link should be inserted into the “href” attribute in the <a> tag (see above)Variable URL – Title – external rule

Button:

CSS selector: td.es-p10 a (alternatively, the entire entry may again be: td.esd-block-button.es-p10 a)
Attribute: href

Varable URL – Button – Internal rule

The "External" tab is not available for this variable, because in fact the link to the website itself is the source of the data search.


Variable b_title (Title)

Let's start with the rule of getting the title text on the "External" tab –> open a web page with the article,move the cursor to the Title text and right-click to bring up the menu for "Inspect mode" (in Google Chrome you can use Ctrl+Shift+I) –> opens a console from which you can read CSS selectors with attributes. 
Variable b_title – External rule

In this case, the rule for getting a title on the External tab is as follows:

CSS selector: h1
Attribute: leave blank

On the Internal tab set:

CSS selector: td.es-p5b h3 a
Attribute: leave blank

Variable b_title – Internal rule

Thanks to this rule, the resulting value of the title text will be used in the <a> tag, which is bounded by the <h3> tag.


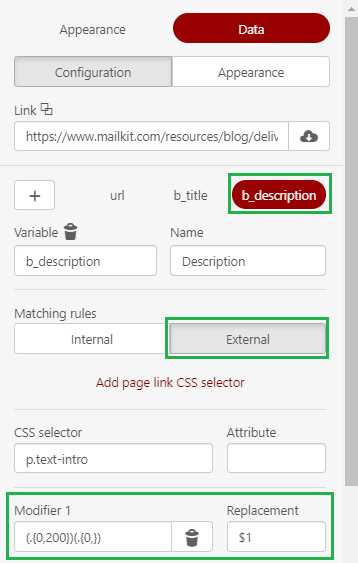
Variable b_description (Perex)

The principle is the same as for the previous variable. 

External tab:
Variable b_description – External rule

CSS selector: p.text-intro
Attribute: leave blank

On the Internal tab, set:
Variable b_description – Internal rule

CSS selector: td.esd-b-desc p
Attribute: leave blank

Thanks to this rule, the resulting value of the article text will be used in the <p> tag.


Now we have the whole smart element ready and we can download data from the web into it. Just insert the article link in the "Link" field:
Smart element – Link

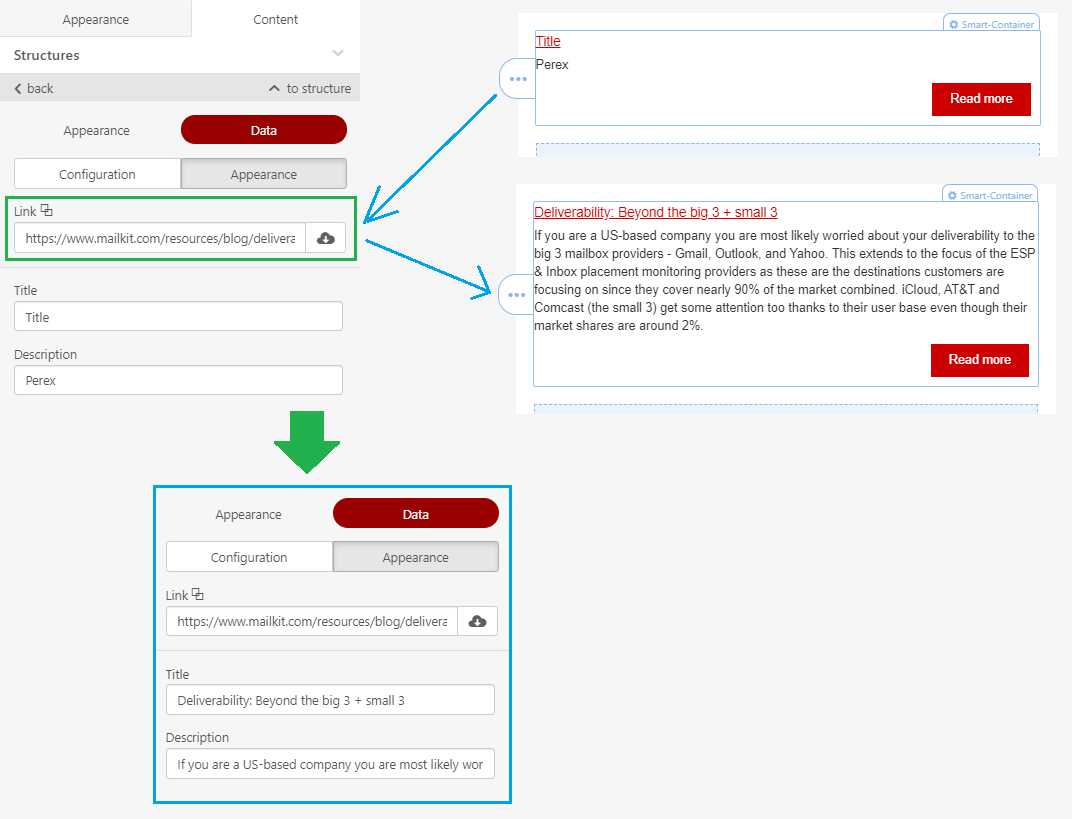
In addition to the smart element, the texts are also copied to the Data –> Appearence table. Here you can optionally edit the texts. If you want to load the original data, just reload the link.

ModifierText shortening can also take place automatically – for example, if we want the perex of the article to always be reduced to 200 characters, just add a Modifier (.{0,200})(.{0,}) in the settings of the External tab of the b_description variable and in the “Replacement" field add $1 and reload the article link if necessary. The text is shortened to the required length.


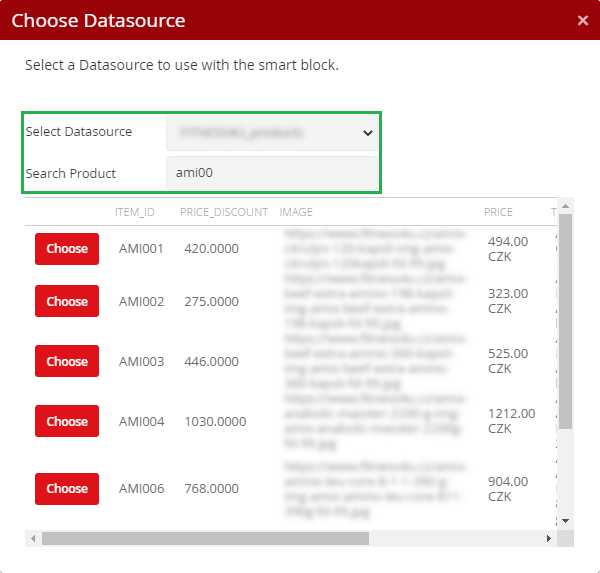
Using a product data source

Source selectionIn addition to external sources, you can also use product data sources imported into Mailkit. You can switch between product and external sources by clicking the My Data/Website button, where My Data means a data source and Website means an external source. Click the Browse button to select a source. 


In the following dialog, select a specific data source and enter the word you want to search by. You must enter at least 3 characters to start the search. The system searches in all fields and narrows the selection with each new character. In our example, we search by ITEM_ID. Select a specific product with the Choose button.

Product selection


ConfigurationIt is now possible to set up the configuration as described above, enter the column name from the data source in the Variable field. Set the internal CSS selector and attribute (from the HTML code of the template) as in the case of an external (website) source.


Contact us

Let us know what your campaign objectives are and we'll create a plan that works for you.

+420 277 001 800
sales@mailkit.com


Processing of information provided using this form is governed by our Privacy Policy.

  • The field Business email is required.
  • The field How many emails do you send out per month? is required.
  • The field Message is required.
  • Incorrect captcha code.
Required
Required
Required
Mailkit logo

A Czech emailing platform with its own infrastructure, that is a leader in international mailing distribution.


  • Features
  • Services
  • Resources
  • About us

services

  • Email Authentication
  • Agency Partnerships
  • Email Training
  • Inbox Brand Visibility
  • Deliverability

ReSOURCES

  • Knowledge Base
  • API documentation
  • Blog
  • Status
  • BIMI inspector
Logo Maawg
Logo Experience
Logo CSA
Logo Signal spam
Logo ISO-27001
Logo ISO-9001
This site is protected by reCAPTCHA and the Google Privacy Policy and Terms of Service apply.
© 2006-2022 Mailkit - All rights reserved